Check the Wheel Alignment and Toe-In Before you start Riding
It is vitally important that you check the wheel alignment and toe in BEFORE you start to ride your MC-95-250 reverse Trike!
None of them seem to be set up properly when delivered. So, here is the method I used:
Checking the Wheel Alignment
-
Position the handlebars square the the frame - I use the bottom of the instrument panel and line it up with that.
-
Clamp a length of wood from the left handle grip to the left rear seat handle to hold the bars parallel.
-
Make up a length of of wood ( e.g. 1" x 1 1/4" x 6'-7') with enough extra Packing pieces to have it touch the inside of the tire rim, but not the rubber, on the front wheel. It should be long enough to go past the rear tire. I'll call this the Measuring Stick A
-
Place another piece of wood on the lower A frame (1 1/4" x 1 1/4" x 12" approx) to rest the Measuring Stick A on so that it can rest with the Packing piece touching both the front and rear edges of the inner rim. Gently slide the Measure Stick A back and forth so that it rests snugly.
-
Go to the rear tire and measure the distance from the rim to the inner (or outer if you prefer) edge of the Measuring Stick A
-
Go to the other side of the trike and carry out [4] to [6] steps.
-
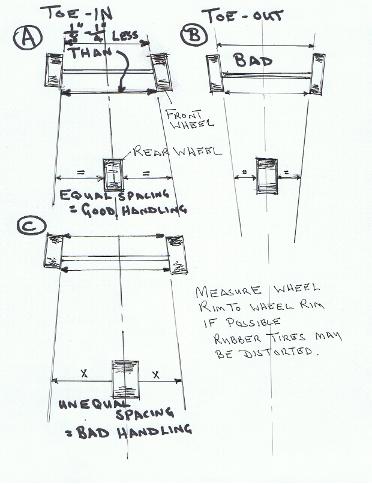
[ Make a note of both of these measurements - they should be the same amount. If not one of the front wheels is out of alignment!
-
[Loosen both the inner and outer locknuts on the Track Rods. (It is not a bad idea to put a piece of masking tape on the rods and mark the current top of each rod) NOTE that there are flats in the track rod to take a wrench.
-
Now adjust each Track Rod by turning it forwards or backwards to make each side give the same measurement at the rear wheel. You probably only need to adjust one side.
Setting the Toe-In
-
Now make up another Measuring Stick (Measuring Stick B). I made mine from a straight 3/8" x 3/8" length of wood, long enough to fit from one front wheel to the other. Put a small nail (panel pin) about 1" in from one end. It needs to stick out about 3/8" max though the wood. This is easier, more rigid and more accurate than a tape measure.
-
Hook the nail into the CENTER groove on the REAR of one tire. Pass the Measuring Stick B under the trike frame, keeping it level, so that it crosses the REAR of the other front tire, at about the same height off the ground.
- Place a pencil mark at the INNER edge of the CENTER groove on the Measuring Stick B, where the stick crosses the tire. Carry this mark around the wood. This is the Rear measurement for the Toe-IN.
-
Hook the nail into the CENTER groove on the FRONT of one tire. Pass the Measuring Stick B under the trike frame, keeping it level, so that it crosses the FRONT of the other front tire, at about the same height off the ground.
-
Place a pencil mark at the INNER edge of the CENTER groove on the Measuring Stick B, where the stick crosses the tire. Carry this mark around the wood. This is the Front measurement for the Toe-IN.
-
With NO Toe-In the Front and Rear measurement marks would be identical. Ideally, you should see the FRONT Toe-in measurement being 1/8"-1/4" (3mm-6mm) LESS than the REAR Toe-In measurement.
-
If not, then adjust both Track Rods until you get this AND keeping the equal spacing at the rear wheel using Measuring stick A. Try to turn the track rods the same amount to keep the wheel alignment equal!
-
Rotating the Track Rod a small amount makes a big difference at the rear wheels.
-
When you finally get a 1/8" difference between the front and rear of the front wheels, AND an equal spacing at the rear wheel you have achieved perfection, grasshopper!
-
NOTE that tightening the trackrod lock nuts seems to reduce the Toe-In slightly - perfection is difficult to achieve ;-). I add threadlock to the locknuts before tightening them.
- I also add a dab of paint on the locknuts and the ends of the tracknuts to show up any movement in the future. I also place a dab of paint on the top of the track rods, about 8" front the outer ends so that I can see if they start to rotate in the future.
- This is the way I do it and it seems to work.
Checking the Two Steering Stops
- While you are doing this it is a good time to make sure that the Two steering stops and tight. They are located just in front of the bottom of the steering rod. The locknuts need to be tight enough to prevent the bolts from rotating. Add threadlock when adjusting them